Have you ever looked closely at the exterior of your home and noticed small, dark spaces opening up where your siding meets your window frames? Those aren’t just cosmetic flaws. Siding gaps around windows and doors are often the first silent alarm bells of a much larger problem brewing beneath the surface.
While a tiny gap might seem harmless—easy to ignore as you rush out the door for work—it acts as an open invitation. It invites moisture, pests, and drafty air directly into your wall cavities. Left unchecked, what starts as a tube of caulk repair can spiral into thousands of dollars in structural rot and mold remediation.
In this comprehensive guide, we will walk you through exactly why these gaps form, the risks they pose, and the practical steps you can take to fix them. Whether you are a DIY enthusiast ready to tackle the weekend or a homeowner deciding if it’s time to call in the experts, this article covers everything you need to know about sealing your home’s envelope tight.
Why Do Siding Gaps Appear?
Before you grab a caulking gun, it is crucial to understand the “why.” Fixing the symptom without addressing the cause is a recipe for frustration. Gaps around windows and doors rarely happen by accident; they are usually the result of specific environmental and structural factors.
Thermal Expansion and Contraction
Northern California sees significant temperature swings. In Sacramento and the Bay Area, scorching summers and chilly, wet winters put your home’s exterior through a rigorous workout. Most siding materials—especially vinyl and wood—expand when hot and contract when cold. If the siding was installed without enough allowance for this movement, or if the material has aged significantly, it can pull away from the stationary frames of your windows and doors.
Foundation Settling
Every house settles over time. As the ground beneath your foundation shifts, the frame of your house moves slightly. While your windows and doors remain rigid within their rough openings, the exterior cladding (your siding) might shift along with the wall studs. This differential movement often manifests as separation gaps at the corners or along the vertical edges of window frames.
Improper Installation
Unfortunately, not all siding jobs are created equal. If the original installers failed to use proper J-channels, flashing, or backer rods, the siding might not sit flush against the trim. Sometimes, installers cut the siding boards too short, hoping the trim would cover the mistake. Over time, gravity and vibration expose these shortcomings.
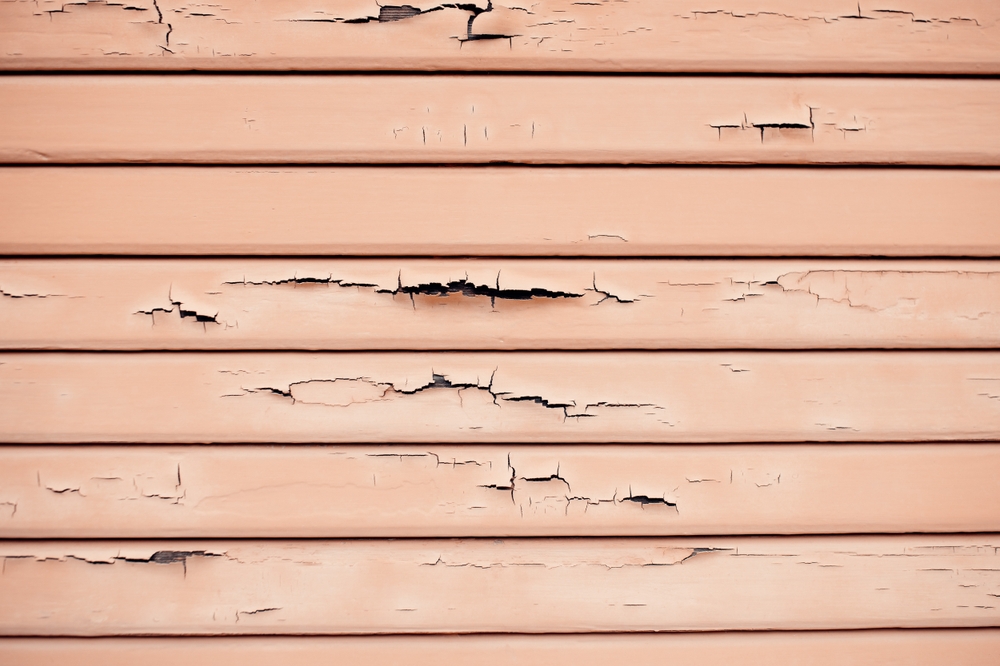
Moisture Damage and Rot
This is the “chicken or the egg” scenario. Sometimes a gap causes rot, but often, hidden rot causes the gap. If water has been infiltrating your walls for years, the wood sheathing or studs behind the siding may be warping or decaying. As the wood swells or crumbles, it pushes the siding outward or allows it to sag, creating visible gaps around penetrations like doors and windows.
The Hidden Dangers of Ignoring Siding Gaps
It is easy to procrastinate on exterior maintenance. However, the cost of inaction is steep. Here is what is at stake when you let those gaps linger.
Water Infiltration and Structural Rot
The most immediate threat is water. Rain doesn’t just fall down; wind drives it sideways. A gap as small as an eighth of an inch can channel gallons of water into your wall cavity during a storm. Once inside, that water soaks into your insulation (rendering it useless) and rots the wood framing. By the time you see water stains on your interior drywall, the damage behind the siding is likely extensive.
Pest Infestations
Your home is a warm, dry fortress that pests are desperate to enter. Gaps around windows are like highway on-ramps for ants, termites, spiders, and even rodents. Mice can squeeze through openings the size of a dime. Once they are in your walls, they chew wiring and insulation, creating fire hazards and health risks.
Energy Loss and Higher Utility Bills
Your home’s “envelope” is the barrier between the conditioned air inside and the weather outside. Gaps puncture this envelope. In the winter, your expensive heated air leaks out; in the summer, the blistering Sacramento heat seeps in. Sealing these gaps is one of the most cost-effective ways to improve your home’s energy efficiency.
Assessing the Damage: When to DIY vs. When to Call a Pro
Not every gap requires a contractor, but some definitely do. Here is a quick checklist to help you decide.
You can likely DIY if:
- The gap is less than 1/2 inch wide.
- The siding boards themselves are solid, not rotting or crumbling.
- There is no sign of mold or mildew around the gap.
- The gap is purely cosmetic or due to minor shrinkage.
You should call a professional if:
- The gap is wider than 1/2 inch.
- You see signs of rot (soft wood, crumbling siding).
- You suspect water has already gotten behind the wall.
- The window frame itself feels loose or shifts when you push it.
- You are dealing with second-story windows that require tall ladders.
For significant issues, professional intervention is safer and cheaper in the long run. If you suspect underlying damage, check out our services for siding repair in Sacramento to ensure the structural integrity of your home is preserved.
Step-by-Step Guide: How to Fix Small Siding Gaps (DIY)
If you have determined the gaps are minor and manageable, here is a detailed walkthrough on how to seal them effectively.
Tools and Materials You Will Need
- High-Quality Exterior Caulk: Look for 100% silicone or a siliconized acrylic latex caulk. Polyurethane caulk is also excellent for durability. Ensure it is “paintable” if you plan to paint over it.
- Caulk Gun: A dripless model saves a lot of mess.
- Backer Rod: A foam rope used to fill larger gaps before caulking.
- Utility Knife: For cutting the caulk tube and trimming old caulk.
- Scraper/Putty Knife: To remove old, cracked sealant.
- Rags and Water: For cleanup.
- Ladder: If working above ground level.
Step 1: Clean the Area Thoroughly
New caulk will not stick to dirt, moss, or old, crumbling caulk. Use your putty knife to scrape away any existing sealant. If there is mildew, scrub the area with a bleach-water solution and let it dry completely. The surface must be bone-dry for the caulk to adhere properly.
Step 2: Insert Backer Rod (For Gaps Wider than 1/4 Inch)
Never try to fill a deep or wide gap solely with caulk. It will eventually sag and crack. Instead, press a foam backer rod into the gap. It should fit snugly, sitting about 1/8 to 1/4 inch below the surface. This provides a stable backing for your sealant and allows the caulk to stretch properly.
Step 3: Apply the Caulk
Cut the tip of your caulk tube at a 45-degree angle. The opening should be slightly smaller than the width of the gap. Load it into the gun and apply steady pressure. Move the gun smoothly along the gap, pushing the bead of caulk into the space rather than just laying it on top.
Step 4: Tool (Smooth) the Bead
Immediately after applying, use a wet finger or a caulk finishing tool to smooth the bead. This pushes the caulk firmly against both the siding and the window frame, ensuring a watertight seal. It also creates a professional-looking concave finish.
Step 5: Paint (If Necessary)
If you used paintable caulk, wait the recommended drying time (usually 24 hours) before painting it to match your siding or trim.
Dealing with Large Gaps: The Professional Approach
Sometimes, a tube of caulk isn’t enough. When gaps are caused by warped boards, improper installation, or significant settling, you need a more robust solution.
Re-flashing the Window
Ideally, windows should have Z-flashing (metal drip cap) installed above the top trim. This directs water out and over the siding rather than behind it. If this is missing, no amount of caulk will stop the water. A professional can carefully pry back the siding, install proper flashing, and reinstall the siding for a permanent fix.
Replacing Damaged Boards
If the siding boards adjacent to the window are warped, cracked, or rotted, they must be replaced. Patching rotted wood is a temporary band-aid that will fail. Replacing boards requires matching the material profile (vinyl, fiber cement, or wood) and ensuring the moisture barrier behind it is intact.
Installing New Trim or J-Channels
For vinyl siding, the interface between the siding and window is handled by a J-channel. If this channel is broken or missing, the siding will look loose and gapped. Replacing J-channels often requires removing the surrounding siding panels—a delicate job best left to experts who know how to unlock and relock vinyl panels without cracking them.
If you are seeing these larger issues, do not risk making it worse. Our team specializes in diagnosing these exact problems. Visit our siding repair page to see how we handle complex exterior restorations.
Preventive Maintenance: Stopping Gaps Before They Start
Once you have fixed your gaps, you want to keep them closed. Regular maintenance is key to extending the life of your siding and windows.
Annual Inspections
Make a habit of walking around your home’s exterior twice a year—once in the spring and once in the fall. Look for:
- Cracked or peeling caulk.
- Loose siding panels.
- Signs of pest activity.
- Vegetation growing too close to the siding (which holds moisture against the house).
Manage Moisture
Ensure your gutters are clean and downspouts direct water at least 5 feet away from your foundation. Keeping the soil around your foundation stable reduces settling, which in turn reduces the shifting that causes gaps.
Refresh Caulk Every 5 Years
Even the best caulk has a lifespan. Over time, UV rays degrade the material, causing it to become brittle and crack. Plan to scrape out and replace key caulked joints around windows and doors every 5 to 7 years.
The Role of Siding Material in Gap Formation
Different materials behave differently. Understanding what is on your house can help you predict and prevent problems.
Vinyl Siding
Vinyl moves a lot. It is designed to “float” on the wall. Gaps here are often due to broken J-channels or unhooked panels. Because vinyl expands so much, caulking vinyl siding directly to a window frame is usually a mistake—it restricts movement and causes buckling. Instead, vinyl relies on proper trim pieces to hide the expansion gaps.
Fiber Cement (James Hardie)
Fiber cement is incredibly stable and durable, but it requires precise installation. Gaps here usually occur if the installer didn’t leave the correct clearance at butt joints or trim intersections. However, unlike vinyl, fiber cement should be caulked at certain vertical joints where it meets trim (check manufacturer specs).
Wood Siding
Wood is hydroscopic—it absorbs and releases water. This constant swelling and shrinking puts immense stress on caulked joints. Wood siding requires the most vigilant maintenance. Keep it painted or stained to minimize water absorption and reduce movement.
Why “Wait and See” is the Worst Strategy
We often hear homeowners say, “I’ll fix it next summer.” The problem is, water doesn’t wait for summer. A gap that admits moisture during a single winter storm can initiate dry rot that spreads silently for months.
By the time you notice the wall feels spongy or the paint starts bubbling on the interior, you have moved from a $50 maintenance repair to a $5,000 structural repair.
In Sacramento’s climate, where dry summers are followed by intense rainy seasons, that oscillation is brutal on building materials. Fixing gaps immediately seals the envelope and arrests the decay cycle.
Conclusion: Secure Your Home’s Envelope Today
Your home is your biggest investment, and its exterior shell is its first line of defense. Siding gaps around windows and doors are more than just unsightly—they are vulnerabilities in your armor.
Whether you choose to grab a caulk gun this weekend or hire a professional to tackle the larger structural issues, the most important action you can take is to act now. Do not let a small gap become a massive headache.
If you are unsure about the severity of the gaps in your siding, or if you simply want peace of mind knowing the job is done right, reach out to us. We have years of experience protecting homes in the Sacramento and Bay Area. Check out our siding repair services and let us help you keep your home dry, efficient, and beautiful for years to come.
Frequently Asked Questions (FAQs)
Q: Can I just use expanding foam to fill large gaps?
A: Generally, no. Standard expanding foam (like Great Stuff) is messy and difficult to trim neatly on an exterior. It also degrades quickly in sunlight. If you must use foam for insulation purposes deep in a cavity, use a “window and door” low-expansion formula, but always cover it with proper backer rod and exterior-grade caulk or trim for the final seal.
Q: How much does professional siding repair cost?
A: Costs vary widely depending on the extent of the damage. A simple re-caulking job is affordable, while replacing rotted structural wood and matching vintage siding is more of an investment. However, professional repair is always cheaper than ignoring the problem until the wall fails.
Q: My vinyl siding looks loose around the window. Should I nail it tight?
A: No! Vinyl siding must hang loosely to expand and contract. Nailing it tight will cause it to buckle and warp when the temperature changes. If it is loose, the locking mechanism may have come undone or the J-channel may be broken.
Q: What is the best time of year to fix siding gaps?
A: Spring and Fall are ideal. You want dry weather with moderate temperatures (between 50°F and 80°F). If it is too cold, caulk won’t cure properly; if it is too hot, it may cure too fast or the siding may be fully expanded, throwing off your gap measurements.


