When it comes to siding, most homeowners focus on color and material — but the real strength of your exterior lies in the details. Corners, windows, and trim are where water, wind, and time test a contractor’s skill. If those areas aren’t handled with precision, even premium siding can fail early, leading to leaks, rot, and costly repairs.
A truly durable siding job is more than just the panels; it’s a complete system where every component works together. Here’s a closer look at how professional installers protect those high-stress points—and how Heritage Exteriors ensures every edge, corner, and window line is built for durability and long-term weather resistance.
Why Corners, Windows, and Trim Are the Real Test of Siding Quality
The large, flat sections of a wall are the easy part. The true test of a siding installer’s craftsmanship is how they manage the transitions—where siding meets a window, turns a corner, or ends at a roofline. These are the areas most vulnerable to water intrusion and wear.
The Details Homeowners Often Overlook
Homeowners are naturally drawn to the overall look of new siding, but it’s the less obvious details that determine performance. Things like the type of sealant used, the way flashing is layered under the siding, and the precision of the cuts around fixtures are what separate a 5-year job from a 30-year investment. Overlooking these details during the hiring process can lead to significant problems down the road.
Why Proper Finishing Separates Pros from Amateurs
An amateur or rushed installer can make siding look decent from 20 feet away. A professional, however, builds it to look great up close and to perform flawlessly for decades. Pros understand that finish work isn’t just cosmetic; it’s a critical part of the weatherproofing system. They take the extra time to make precise cuts, properly seal every joint, and ensure every component is integrated correctly. This meticulous approach is the hallmark of true craftsmanship.
What “Durability” Really Means in Exterior Work
In the context of siding, durability isn’t just about the material’s strength. It’s about the resilience of the entire system. A durable installation is one that resists water intrusion, stands up to local climate stresses, holds its appearance without fading, and requires minimal maintenance over its lifespan. This level of durability is only achieved when high-quality materials are combined with expert finish work.
How Professional Installers Approach Corners
Corners are a primary point of impact and a key area for potential water intrusion. How they are constructed and sealed is a strong indicator of the overall quality of the job.
The Role of Corner Boards and Flashing in Weatherproofing
Corner boards serve both an aesthetic and a functional purpose. They create a clean, crisp edge that defines the home’s architecture. More importantly, they provide a solid surface for the siding panels to butt up against, creating a joint that can be properly sealed. Behind the corner boards, skilled installers ensure the weather-resistive barrier (house wrap) is continuous and properly flashed to create a seamless waterproof shield.
Mitered vs. Butt Joints — Which Lasts Longer?
- Mitered Corners: This is a technique where two corner boards are cut at 45-degree angles to meet in a sharp, clean point. It offers a very high-end, seamless look but requires immense skill to execute perfectly. If not done right, the joint can open over time.
- Butt Joints: This is the more common and often more durable method, where one board overlaps the edge of the other. It creates a slightly more traditional look and is less prone to separating over time, making it a very reliable choice for long-term performance.
A professional installer will know which method is best for the chosen material and the home’s style.
How Heritage Exteriors Handles Tahoe’s Snow and Bay Area Winds
Our approach to corners is adapted to the local climate. In Lake Tahoe, we ensure corners are robustly sealed and flashed to prevent water from ice dams from getting behind them. In the windy Bay Area, we use fastening patterns that provide extra strength at the corners, which bear the brunt of wind forces. This localized expertise ensures maximum durability.
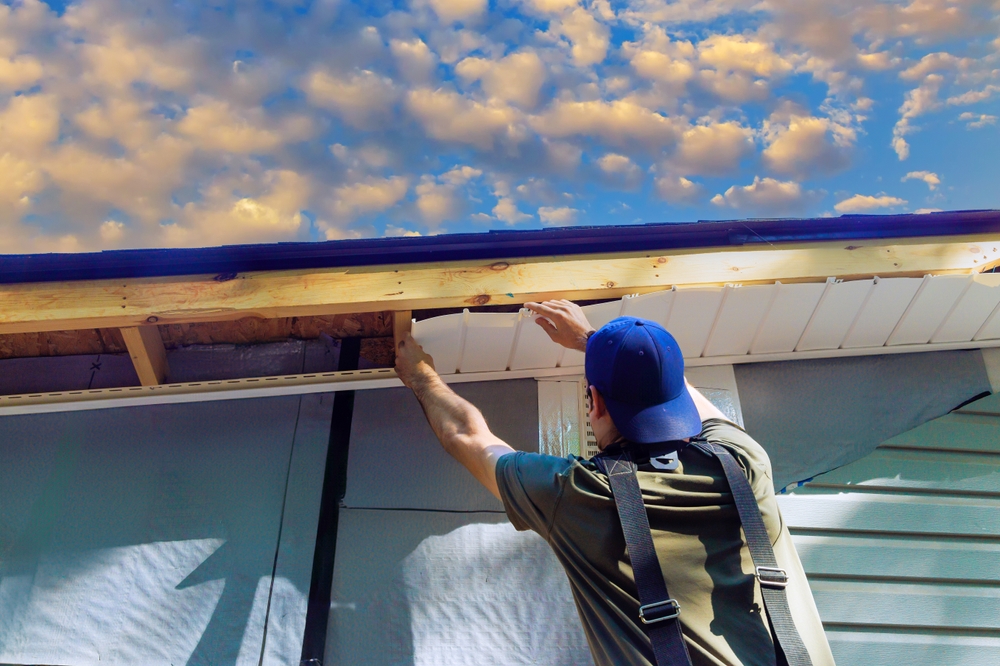
Precision Work Around Windows and Doors
Windows and doors are essentially large holes in your wall. If they aren’t properly integrated with the siding system, they become the primary entry points for water.
The Problem with Gaps, Cracks, and Uneven Cuts
Sloppy cuts around windows are more than just an eyesore. Gaps between the siding and the window trim create channels for water to run directly into your wall cavity. These gaps are often filled with excessive amounts of low-grade caulk by amateur installers, but this is a temporary fix at best. The caulk will fail, and the leaks will begin.
How Proper Flashing Prevents Moisture Damage
This is the most critical step in protecting your windows. A professional crew installs layers of metal flashing and specialized flashing tape in a specific, weatherboard-style sequence. The house wrap is lapped over the flashing at the top of the window, not the other way around. This ensures that any water that gets behind the siding is directed out and away from the window opening, not into it. This meticulous process is non-negotiable for a waterproof installation.
Pro Tip: Ask your contractor to explain their specific window flashing process. They should be able to describe how they layer the house wrap, flashing tape, and metal head flashing. If they can’t explain it, they probably don’t do it right.
Integrating Siding and Trim for a Seamless Look
The siding should meet the window trim with a consistent, clean gap that is then properly sealed with a high-quality, flexible sealant. The goal is a finished look that appears intentional and integrated, not like the siding was simply cut around an obstacle. This requires careful measurement and precise cutting on every single piece.
Energy Efficiency Benefits of Proper Window Sealing
A well-sealed window and trim package doesn’t just keep water out; it also keeps air out. By eliminating gaps and properly sealing the perimeter, you reduce air infiltration, which can help lower your heating and cooling bills and make your home more comfortable year-round.
Choosing the Right Trim Materials for Strength & Curb Appeal
The trim is the frame for your siding masterpiece. The material you choose affects both the look and the longevity of your home’s exterior.
Comparing Wood, PVC, and Fiber Cement Trim
- Wood Trim: Offers a classic, traditional look but requires the most maintenance. It must be regularly painted or stained to protect it from rot and pests, especially in moist climates.
- PVC Trim: A plastic-based material that is impervious to moisture and rot, making it very low-maintenance. However, it can expand and contract significantly with temperature changes and may not offer the same premium feel as other options.
- Fiber Cement Trim: The superior choice for most applications. It has the solid feel and appearance of wood but is resistant to rot, pests, and fire. It is also dimensionally stable, meaning it won’t warp or swell.
Why Fiber Cement Trim Excels in California Climates
For Northern California, fiber cement trim is the clear winner. In Sacramento, it stands up to intense sun and heat without warping. In the Bay Area, it’s unaffected by moisture and fog. In Tahoe, it won’t rot when buried in snow and can handle extreme temperature swings. Its versatility and durability make it the ideal choice for any of these environments.
How Trim Color and Texture Enhance Architectural Style
Trim is a powerful design tool. A wide trim can give a home a more substantial, traditional look, while a narrow, smooth trim can create a modern aesthetic. Using a contrasting trim color can make your home’s architectural features pop, while a matching color creates a more subtle, monolithic appearance.
Heritage Exteriors’ Recommended Products
We are a James Hardie Preferred Installer, and we strongly recommend their line of HardieTrim® boards. They offer the same exceptional durability and performance as their siding products and come in a variety of styles and textures. This allows us to create a complete, integrated, and fully warrantied siding and trim system for our clients.
Mistakes to Avoid When Finishing Siding Edges
The final details are where rushed or inexperienced crews cut corners—literally and figuratively.
Poor Caulking and Unsealed Joints
Low-quality caulk will shrink, crack, and pull away from the joint within a few years, creating an entry point for water. Professionals use high-grade, elastomeric or polyurethane sealants that are designed to remain flexible for decades. They also know where to caulk—and just as importantly, where not to caulk. For example, the bottom edge of a siding panel should never be caulked, as this can trap water.
Overlapping Issues That Cause Leaks
The entire system of house wrap, flashing, and siding must be installed in overlapping layers, like shingles on a roof. Each higher layer must overlap the layer below it to shed water. A reversed lap at any point will funnel water directly into the wall.
Forgetting Expansion Gaps or Alignment Checks
Forgetting to leave proper expansion gaps at joints will cause siding to buckle and warp. Failing to constantly check for level and alignment will result in wavy, unprofessional-looking lines that are impossible to fix without a complete re-installation.
Inexperienced Crews Cutting Corners (Literally)
Making precise, clean cuts in fiber cement or wood requires skill and the right tools. Inexperienced installers often produce chipped, jagged cuts that they then try to hide with excessive caulk. This not only looks bad but also creates a weak point in the system.
How Heritage Exteriors Ensures Flawless Finishes
Our entire process is designed to deliver a perfect finish on every job. This commitment to detail is what sets us apart.
In-House Installation Crews, No Subcontractors
This is the key to our quality control. We do not use subcontractors. Our installation crews are our full-time, professionally trained employees. They are experts in our methods and are accountable to our high standards for craftsmanship. This allows us to guarantee a consistent, high-quality finish on every project.
Daily Quality Checks and Jobsite Cleanliness
Our project managers perform regular quality checks throughout the installation process, paying close attention to the finish details. We also maintain a clean and organized job site, which is a reflection of the care and professionalism we bring to the work itself.
Using James Hardie Products for Precision Fit
We use a complete system of James Hardie products, including their siding, trim, and soffit panels. These products are engineered to work together, allowing for a precise fit and a fully integrated, high-performance exterior.
Long-Term Warranty Support on Every Installation
We stand behind our work with a comprehensive labor warranty, in addition to the manufacturer’s material warranty. Because our crews are factory-trained, you can be confident that your material warranty will be fully honored. This dual protection offers complete peace of mind.
Regional Factors That Impact Siding Trim and Corners
Sacramento’s Intense Heat and UV Exposure
In Sacramento, trim materials must be stable enough not to warp in 100°+ temperatures and have a finish that resists fading from constant UV exposure. This makes factory-finished fiber cement trim the ideal choice.
Bay Area’s Coastal Moisture and Salt Air
For homes near the coast, all trim and fasteners must be resistant to corrosion. Fiber cement and PVC trim are excellent choices, as they will not rot or degrade from the damp, salty air.
Tahoe’s Freeze-Thaw Expansion and Snow Load
In Tahoe, trim must be able to handle being buried in snow and ice for months. Fiber cement is perfect because it does not absorb water and is not susceptible to the cracking and splitting that can affect wood during freeze-thaw cycles.
Why Proper Trim Choice Matters Across All Three Regions
In every Northern California climate, the trim is a critical component of the weatherproofing system. Choosing the right material and ensuring it’s installed with meticulous detail is essential for a durable, low-maintenance exterior.
Frequently Asked Questions about Corners, Windows & Trim During Siding Installation
Should window trim be replaced during siding installation?
In most cases, yes. A full siding replacement is the perfect opportunity to install new, high-performance trim that can be properly integrated with the new weather-resistive barrier and flashing. Reusing old trim often leads to a compromised seal.
How do installers waterproof siding corners?
They ensure the weather-resistive barrier is wrapped continuously around the corner, and then they install the corner boards and siding, sealing all joints with a high-quality, flexible sealant according to manufacturer specifications.
What’s the best trim for fiber cement siding?
The best trim for fiber cement siding is fiber cement trim from the same manufacturer, such as HardieTrim® for James Hardie siding. This ensures material compatibility, consistent performance, and a unified warranty.
How can I tell if my corners and edges were sealed correctly?
Look for clean, consistent beads of caulk that are smooth and fully adhered to both surfaces. There should be no visible gaps or cracks. The siding should meet the trim with even, precise lines.
Get Durable, Weatherproof Siding Installed Right the First Time
Perfect siding isn’t just about panels — it’s about the finishing touches that protect your home for decades. A beautiful, resilient exterior is a system where every piece, no matter how small, is installed with care and expertise. At Heritage Exteriors, we handle every detail in-house, from tight corners to flawless window trim, ensuring your home looks great and stays protected year-round.
The difference between a quick siding job and one that lasts 30 years comes down to precision. At Heritage Exteriors, every corner, seam, and window edge is sealed for strength and style—because real durability lives in the details.
Call 916-546-2991 or request your free estimate for professional siding installation in Sacramento, the Bay Area, and Lake Tahoe.


