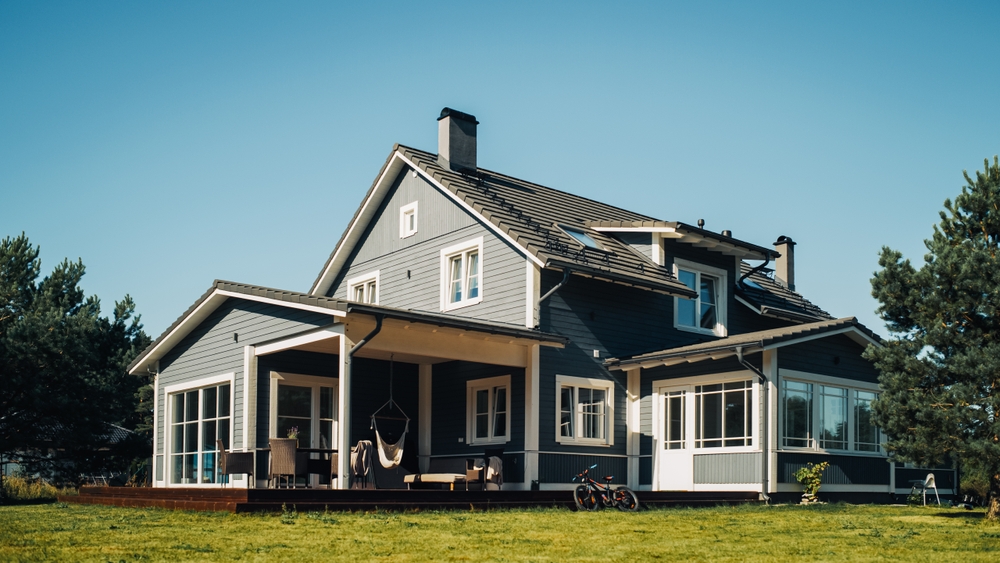
A full exterior remodel is one of the most transformative projects you can undertake for your home. But for many homeowners, the process itself can feel like a mystery. You know what the “before” looks like, and you have a vision for the “after,” but the steps in between are often unclear. How long does siding and window replacement really take? What happens first? And what should you expect from the crew working on your property?
Knowing the sequence of events helps you plan your life and gives you confidence that the project is moving forward correctly. A professional contractor operates with a clear, transparent schedule, ensuring you’re informed from the first day of prep to the final cleanup. This week-by-week timeline breaks down what a typical full exterior remodel looks like, so you know exactly what to expect.
Before the Build: What Happens in the Prep Phase
Long before the first hammer swings, a series of important steps sets the stage for a smooth project. This exterior remodel prep phase is all about planning, coordination, and clear communication.
First, we conduct a final site walk-through to confirm all the details of the project scope. This is when we finalize material choices, paint colors, and any special instructions. Shortly after, you’ll see materials delivered to your property, usually staged neatly in a designated area of your driveway or yard to minimize disruption.
Behind the scenes, we handle the permit timeline with your local city or county. In the Sacramento area, this process can vary, but we manage it for you. We also keep a close eye on the weather. A rainy forecast or an intense heatwave in Northern California can affect the start date, but we’ll keep you updated. As homeowners like Shelley Jacobson mention, our communication starts early and stays consistent, so you’re never left guessing.
Week 1 — Demo & Sheathing Repairs
The first week of physical work is often the most dramatic. This is when the old, tired exterior comes off, revealing what’s underneath. It’s a noisy and dusty process, but a skilled crew knows how to execute it cleanly and efficiently.
Removing Old Siding and Trim Without Damaging the Home
The siding demo process involves carefully removing the old siding—whether it’s wood, vinyl, or stucco—and the existing trim. Our crews work methodically to detach the old materials without causing unnecessary damage to the structure, windows, or surrounding landscaping. All debris is collected and placed in a designated dumpster or trailer for disposal.
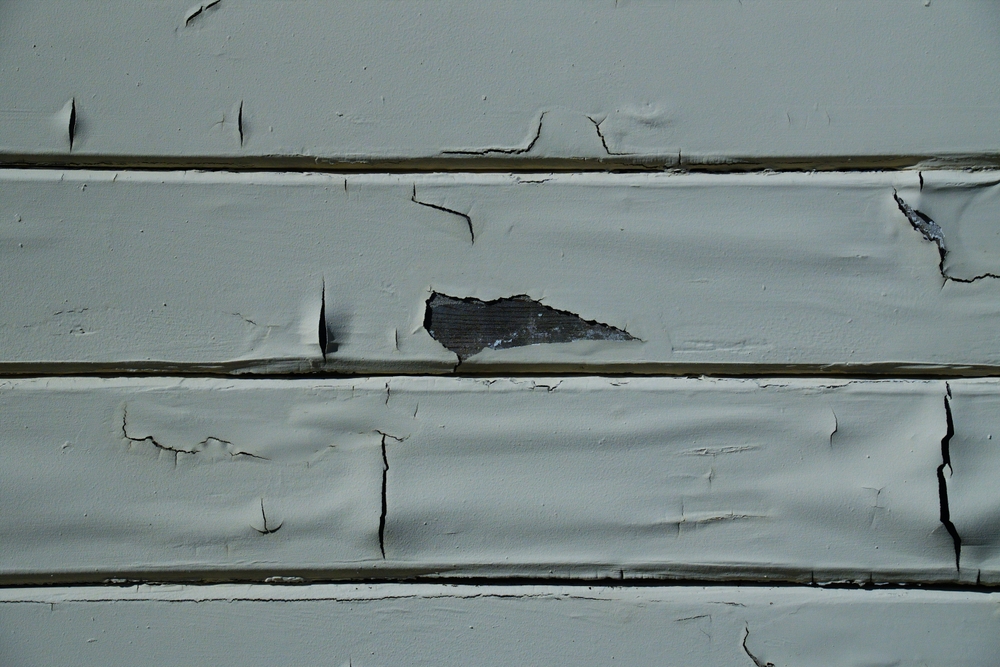
Why Hidden Issues Show Up During Demo
Once the old siding is gone, your home’s walls are exposed. This is the moment of truth, where hidden issues that have been festering for years finally come to light. It’s common to find sections of dry rot, water damage around windows, or evidence of insect infestation. In many older Sacramento homes, we also discover outdated construction methods that need to be brought up to modern standards.
Adding New Sheathing for Strength and Energy Efficiency
One of the most common findings is missing or inadequate wall sheathing. Many homes built decades ago had siding installed directly over the wall studs. A proper sheathing inspection will reveal this. Like in situations similar to what customers like David Kutz experienced, adding a layer of OSB (oriented strand board) sheathing is a critical upgrade. This step adds immense structural rigidity to your home, provides a solid surface for the new siding, and significantly improves insulation and energy efficiency.
Week 2 — Installing New Siding (James Hardie or Comparable)
With the demolition complete and any necessary repairs made, the transformation truly begins. Week two is typically focused on installing the new siding, and the house starts to take on its new personality. The siding install timeline can vary based on the home’s size and complexity, but this phase is all about precision.
Laying Out Straight Lines and Clean Transitions
The James Hardie installation steps require skill and an eye for detail. Our crews start by laying out chalk lines to ensure every course of siding is perfectly level. They work their way up the walls, carefully cutting and fitting each plank. The focus is on creating straight, clean lines and seamless transitions, especially around corners and complex architectural features. This craftsmanship is what separates a good siding job from a great one.
How Crews Protect Landscaping and Walkways During This Phase
A professional crew treats your property with respect. During installation, we take care to protect your landscaping, walkways, and patios. We use tarps and other coverings to shield plants and hardscaping from dust and debris. As Shelley Jacobson noted in her review of our work, our “crews cleaned up every day… always respectful of the home.” This commitment to cleanliness is a core part of our process.
Week 3 — Window Installation and Weatherproofing
If your project includes new windows, this is often the week they are installed. A combined siding and window combo project requires careful coordination to ensure both elements are integrated perfectly for a beautiful and weather-tight finish.
Why Windows Typically Come After Siding Begins
The window replacement timeline is intentionally placed after the siding demolition and sheathing repairs. This allows us to create a perfect opening and properly integrate the new window into the wall’s weather-resistant barrier. Installing the window at this stage ensures a flawless seal that prevents leaks for decades to come.
Flashing, Waterproofing, and Inspection Points
This step is critical for your home’s long-term health. Each new window is installed with new flashing, a material that directs water away from the wall opening. We meticulously apply waterproofing membranes and high-quality sealants around the window frame. These details are inspected to ensure they meet or exceed building codes, creating a virtually impenetrable barrier against wind and rain. Customers like Manuel Pineda often mention the crew’s patience and attention to detail during this phase, as we take the time to answer questions and ensure everything is done right.
Week 4 — Trim, Fascia, and Exterior Details
With the main siding and windows in place, the focus shifts to the finishing touches that give a home its character. The exterior trim process is where the architectural style of the house is defined and refined.
How Trim Shapes the Look of the Final Home
Trim is the frame for your home’s picture. We install new trim around windows, doors, and corners using durable materials like Hardie trim. This step requires precision cutting and fitting to create crisp, clean lines that complement the siding. The choice of trim style—from simple and modern to more decorative—has a huge impact on the final look.
Venting, Lighting, and Electrical Box Updates
A full exterior remodel is the perfect time to address outdated or poorly placed functional elements. During this week, we handle updates to dryer vents, install new mounting blocks for exterior lighting, and properly frame around electrical panels and outlets. As Lorraine Richards mentioned in her review, these details matter. She noted how every detail, from the “electrical outlet, the power panel, the matching caulking, the new dryer vent…was done perfectly.”
Week 5 — Prep, Paint, and Final Touches
The final week is all about bringing the project to a beautiful conclusion. The exterior paint timeline is the last major step, and it’s what makes the entire project come together visually.
Why Paint Comes Last in a Full Exterior Remodel
We follow a specific sequence for a reason. Painting is done last to ensure a flawless finish. This allows all caulking and sealants to cure properly and prevents the new paint from being scuffed or damaged during the final stages of construction. The siding paint process begins with thorough prep work, including masking off windows and protecting surrounding surfaces.
Matching Caulking, Colors, and Lines
Our paint crews are meticulous. They use high-quality exterior paint designed to last in the Northern California climate. Caulking is color-matched to the trim or siding for a clean, seamless look. Every paint line is cut with precision, creating a sharp, professional appearance that highlights the home’s architectural details.
Final Walkthrough & Quality Assurance
Once the painting is complete and all equipment has been removed, we conduct a final walkthrough with you. This is our chance to ensure every detail meets your expectations and our own high standards of quality. Our goal is to complete projects like the ones Brooke Baynton experienced, where all work was “completed on schedule and within budget.”
How We Keep Job Sites Clean Throughout the Project
One of the biggest concerns for homeowners during a remodel is the mess. A professional siding contractor understands that they are guests at your home, and cleanliness is a sign of respect.
Daily Cleanup: What You’ll Actually See
We don’t wait until the end of the project to clean up. At the end of every single workday, our crews tidy the job site. This means sweeping up dust and debris, organizing tools, and consolidating materials. As Shelley Jacobson shared, “The team cleaned up before they left each day.” This daily jobsite cleanup minimizes the disruption to your family and keeps the property safe.
Protecting Driveways, Yards, and Pets
Beyond just sweeping, we take proactive steps to protect your property. We’re careful about where we park vehicles and place materials to avoid damaging driveways and lawns. For homeowners with pets or children, this daily diligence is especially important. Some customers, like Luke Foster, have even noted how our crews “swept every night and checked for nails and screws” to ensure safety.
Staying on Schedule — Even Around Weather and Holidays
A reliable siding project schedule is crucial. While unforeseen issues can arise, an experienced contractor knows how to manage the timeline effectively and communicate proactively.
How Rain Impacts Exterior Remodel Timelines in Sacramento
Sacramento weather is generally favorable for construction, but rain can cause delays. Certain tasks, like demolition, painting, and applying caulk, cannot be done in wet conditions. If rain is in the forecast, we will adjust the schedule and keep you informed, ensuring that work only proceeds when it can be done to the highest quality standards.
Planning Around Heat Waves, Holidays, and Delays
Summer heat waves can also impact productivity and safety. We may adjust work hours to earlier in the day to avoid the peak heat. We also plan around major holidays to minimize disruption. As Scott Doyen mentioned in his review, his large project “started just after the July 4th weekend,” and our “crew was out each day” to ensure the project was “finished within weeks” and on schedule.
A Real Sacramento Timeline: Example From a Recent Full Exterior Remodel
To bring this all together, let’s look at a real example of a Sacramento remodel process.
Project Overview (Neighborhood, Home Type, Before Conditions)
Consider a typical 1980s ranch-style home in a Sacramento suburb like Citrus Heights or Fair Oaks. The original T1-11 wood siding was peeling, faded, and showing signs of water damage near the ground. The single-pane aluminum windows were inefficient and outdated.
Week-by-Week Breakdown With Photos or Notes
- Week 1: The old T1-11 siding was removed. We discovered minor dry rot at two corners and missing sheathing across the front of the house. The crew repaired the rot and installed new OSB sheathing.
- Week 2: New James Hardie lap siding was installed. The crew worked methodically around the house, ensuring all lines were level and clean.
- Week 3: The old aluminum windows were removed, and new energy-efficient vinyl windows were installed, complete with new flashing and weatherproofing.
- Week 4: HardieTrim boards were installed around the new windows and at the corners, and the old fascia boards were replaced.
- Week 5: The entire exterior was prepped and painted with two coats of premium paint. The final walkthrough was completed with the homeowner.
What the Homeowner Said About the Experience
The result was a complete transformation. Like many of our Sacramento-area customers, such as Stacey Leanos, the homeowner was thrilled that their “house looks brand new.” The project was completed on time and on budget, turning an aging property into one of the sharpest-looking homes on the block.
How to Tell If Your Home Is Ready for a Full Exterior Remodel
Are you wondering if you need a full remodel or just a repair? Look for widespread signs you need new siding, such as extensive cracking, warping, or fading across multiple walls. If you have several failing windows, high energy bills, or visible rot, it’s likely time for a full replacement. A siding repair vs replacement decision often comes down to whether the problems are isolated or systemic.
Choosing the Right Contractor for a Smooth Exterior Remodel Timeline
The success of your project depends almost entirely on the contractor you choose. A smooth exterior remodel timeline is the hallmark of a professional, well-managed company.
Questions to Ask Before You Start
- Can you provide a detailed, week-by-week timeline?
- How do you handle hidden issues and change orders?
- What is your daily cleanup process?
- Can I see examples of recent projects and speak to references?
Red Flags to Watch For
Beware of contractors who provide a vague quote, have no clear schedule, or pressure you to make a decision immediately. A lack of online reviews or a portfolio of work is also a major red flag.
Why Homeowners Mention Heritage Exteriors by Name
We believe our work speaks for itself, but our customers’ words are even more powerful. Homeowners like Zane Anderson and Greg K. consistently mention that the job was done as promised, within the agreed-upon timeframe, and with respectful crews. The reason so many neighbors stop to ask “who did your house?” is because the quality is evident in every detail.
Thinking About a Remodel? Here’s What Your Timeline Could Look Like
If you’re considering a siding and window project, this timeline provides a realistic framework. For most Sacramento homeowners, a full exterior remodel is a 4-to-6-week process that fundamentally improves a home’s beauty, durability, and value. The first step is to get a clear, comprehensive estimate from a contractor you can trust. We provide free, no-pressure consultations to help you understand what your specific project would entail.