
Introduction — Why Lap Siding Deserves More Attention
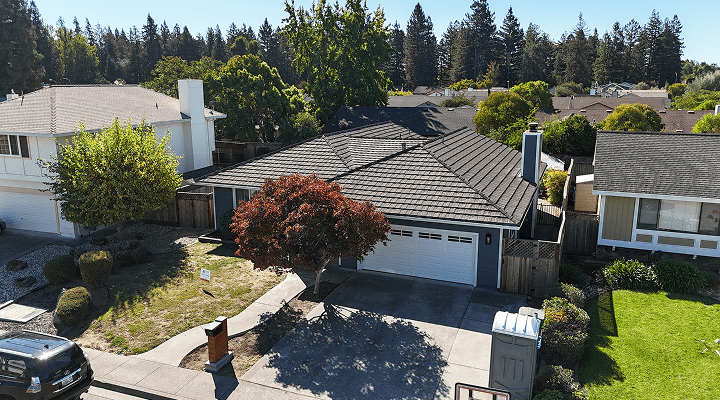
Your home’s exterior is its first line of defense and its first impression. While roofs, windows, and landscaping often take center stage in renovation discussions, siding is the single largest visual element that ties everything together. Among the many siding options available, one style has consistently remained the most popular choice for American homes: lap siding. Its timeless appeal and practical benefits make it a worthy investment for any homeowner.
The Overlooked Element That Defines a Home’s Character
Siding is more than just a protective layer; it’s the canvas upon which your home’s personality is painted. The texture, color, and lines of your siding can transform a simple structure into a charming cottage, a stately colonial, or a sleek modern residence. Lap siding, with its classic overlapping planks, creates clean, horizontal lines that add visual interest and a sense of sturdy, grounded presence. This often-underestimated feature is fundamental to a home’s architectural identity.
How Siding Affects First Impressions and Property Value
Curb appeal is not just a buzzword for real estate agents; it’s a tangible asset. The National Association of Realtors consistently reports that exterior replacement projects, such as siding installation, yield one of the highest returns on investment. A home with fresh, well-installed lap siding looks cared for, modern, and structurally sound. This powerful first impression can significantly boost its market value and attract potential buyers, making it a wise financial decision for the long term.
The Connection Between Aesthetics, Durability, and Energy Efficiency
Modern lap siding is where form truly meets function. It’s no longer just about looks. Advances in material science mean that today’s siding options offer an integrated solution for aesthetics, durability, and energy efficiency. From weather-resistant fiber cement to insulated vinyl, lap siding can help protect your home from harsh elements, reduce maintenance, and even lower your energy bills by providing an extra layer of thermal resistance. This triple benefit makes it a smart, holistic upgrade.
What You’ll Learn in This Guide
This comprehensive guide is designed to be your ultimate resource for understanding and mastering lap siding. We will cover everything from the basic principles and history of this siding style to a detailed comparison of materials like vinyl, wood, and fiber cement. We’ll walk you through the entire installation process step-by-step, highlight common mistakes to avoid, and provide expert tips for maintenance and longevity. Whether you’re a determined DIYer or planning to hire a professional, this guide will empower you to make informed decisions and achieve a beautiful, durable finish for your home.
Understanding Lap Siding
Before diving into the technical details of installation, it’s essential to grasp what lap siding is and why it has become such a dominant force in residential construction. Its popularity stems from a simple yet effective design principle that has been refined over centuries.
What Is Lap Siding? The Overlapping Plank Principle Explained
Lap siding consists of long planks, or boards, that are installed horizontally on a home’s exterior. The core concept is in its name: each board overlaps the one below it. This overlapping technique serves a critical function: it creates a weather-tight seal that effectively sheds water, preventing it from penetrating the wall structure. The water runs down the face of each plank and is directed away from the seam, protecting the sheathing and framing underneath.
Key Features That Differentiate Lap Siding From Other Styles
While other siding styles exist, lap siding has distinct characteristics. Unlike panel siding, which comes in large sheets, or shingle siding, which uses smaller, staggered pieces, lap siding is defined by its long, linear boards. This creates strong horizontal shadow lines that add depth and dimension to a wall. Its main differentiator from vertical styles like board-and-batten is its horizontal orientation, which gives homes a wider, more grounded appearance.
Why It’s the Most Popular Exterior Siding Choice in the U.S.
Several factors contribute to lap siding’s reign as America’s top choice. First, its aesthetic is incredibly versatile, complementing a wide range of architectural styles from classic Colonial to contemporary farmhouses. Second, its performance is proven; the overlapping design is a time-tested method for weather protection. Finally, the availability of diverse materials—from affordable vinyl to durable fiber cement—means there is a lap siding option for nearly every budget and climate.
How Lap Siding Combines Design Flexibility and Practicality
Homeowners love lap siding because it doesn’t force them to choose between beauty and function. You can achieve a custom look by varying the plank width (known as the “reveal” or “exposure”), texture (smooth or wood-grained), and color. At the same time, you get a robust, low-maintenance exterior that stands up to rain, wind, and time. This perfect marriage of design freedom and practical performance is the secret to its enduring appeal.
A Brief History of Lap Siding
The simple concept of overlapping planks to shed water is an ancient one, with roots that stretch back further than modern construction. Its evolution is a fascinating story of shared knowledge between different trades and a continuous search for better, more durable building materials.
From Thatch and Timber to Modern Composite Panels
Early forms of weatherproofing walls involved rudimentary materials like thatch, woven wattle, and rough-hewn timbers. The idea of layering materials to create a weather-resistant barrier is not new. However, the refinement of this concept into precisely milled siding planks marked a significant leap forward in building technology, moving from rustic shelters to structured, durable homes.
Early Shipbuilding Techniques That Inspired Shiplap
The history of lap siding is closely intertwined with shipbuilding. Boat builders in Scandinavia and other parts of Europe developed techniques to create watertight hulls by overlapping wooden planks. One such method, known as “clinker” or “lapstrake” construction, involved fastening planks so that the edges overlapped. This same principle was later applied to buildings. A related technique, shiplap, used a special rabbet joint to create a tighter, flush fit—a method also borrowed from ship construction to keep water out.
How Colonial Architecture Popularized “Lap” Construction
When European settlers arrived in North America, they brought their building traditions with them. In the resource-rich colonies, wood was abundant. Clapboard siding, a type of lap siding made by radially sawing logs to create tapered planks, became a hallmark of New England and Colonial architecture. This style, known as “weatherboarding” in England, was practical, efficient, and perfectly suited to the local materials and climate, cementing lap siding’s place in American design.
Evolution of Materials: From Wood to Fiber Cement and Vinyl
For centuries, wood was the only option for lap siding. While beautiful and traditional, wood requires significant maintenance. The 20th century brought a revolution in materials science. The introduction of aluminum and then vinyl siding in the mid-1900s offered homeowners a low-maintenance alternative. Later, the development of engineered wood and fiber cement in the late 20th century provided even more durable, fire-resistant, and stable options, bringing the ancient concept of lap siding firmly into the modern era.
The Different Styles of Lap Siding
The term “lap siding” is an umbrella category that encompasses several distinct styles. Each offers a unique aesthetic, with subtle differences in profile, shadow lines, and texture. Understanding these variations will help you choose the perfect look for your home’s architecture.
Traditional Lap Siding — The Classic Horizontal Overlap
This is the most common and straightforward style. It consists of horizontal planks, each overlapping the one below it by about one to two inches. The bottom edge of each plank is typically thicker than the top edge, creating a slight wedge shape that produces a distinct shadow line. It’s a timeless, versatile look that suits almost any home.
Board-and-Batten Siding — Rustic Charm and Vertical Lines
Though often discussed separately, board-and-batten is a type of lap construction applied vertically. It involves wide boards (the “boards”) spaced apart, with narrower strips (the “battens”) covering the seams. The battens overlap the edges of the boards, creating a weather-tight seal and a distinctive, rhythmic pattern of light and shadow. It’s a popular choice for farmhouse, barn-style, and rustic modern homes.
Clapboard Siding — New England’s Historic Favorite
Clapboard is a specific type of traditional lap siding, historically made from split or radially sawn oak, pine, or cedar. True clapboards are wedge-shaped, being thinner at the top and thicker at the bottom. This tapering creates crisp, clean shadow lines and a classic, elegant appearance strongly associated with Colonial, Cape Cod, and other historic American home styles.
Shiplap Siding — Sleek, Tight-Fit Panels With Minimal Shadow Lines
Shiplap has surged in popularity recently, moving from rustic interiors to sophisticated exteriors. Each plank has a special rabbet joint (a step-like groove) cut into its top and bottom edges. These joints fit together snugly, creating a tight seal with a very subtle, fine shadow line. The result is a smoother, more uniform surface than traditional lap siding, ideal for modern and transitional designs.
Dutch Lap or Horizontal Siding — Curved Design With Visual Depth
Dutch lap siding is a variation of traditional lap siding distinguished by its profile. The face of each plank is not flat; instead, it has a concave curve, or “cove,” carved into the top edge. When overlapped, this creates a more pronounced, curved shadow line that adds significant visual depth and texture to the wall. This decorative detail gives it a handcrafted, premium appearance.
Beaded Lap Siding — Decorative Grooves for a Premium Finish
Beaded lap siding adds another layer of detail. At the bottom edge of each plank, a small, rounded groove—the “bead”—is milled. This bead creates a delicate shadow line that subtly defines each course of siding. It’s a refined, upscale look often found on historic homes in the southern United States, particularly in places like Charleston and Savannah, lending an air of classic elegance.
Vinyl Lap Siding — Low Maintenance, High Impact
Vinyl is a synthetic siding made from PVC plastic. It is manufactured to mimic the various styles of lap siding, including traditional, Dutch lap, and beaded profiles, often with an embossed wood-grain texture. Its primary benefits are affordability, low maintenance (it never needs painting), and resistance to rot and insects. Modern vinyl siding comes in a huge range of colors and offers improved fade resistance.
Fiber Cement Lap Siding — Strength and Fire Resistance Combined
Fiber cement is a composite material made from sand, cement, water, and cellulose fibers. It is incredibly durable, resistant to fire, insects, rot, and impact. It can be molded to perfectly replicate the look of wood, from smooth planks to deep wood grains. While heavier and more expensive than vinyl, its longevity and robust performance make it a top-tier choice for homeowners seeking maximum protection.
Engineered Wood Lap Siding — Eco-Friendly Yet Durable
Engineered wood siding, also known as composite wood, is made from wood fibers or strands combined with waxes and resins and compressed under high heat and pressure. This process creates a product that is more stable, dense, and resistant to moisture and pests than traditional wood. It offers the authentic look of wood without many of its maintenance drawbacks and is often made from recycled or sustainably sourced materials.
Comparing Lap Siding Materials
Choosing the right material is the most critical decision you’ll make in your siding project. Your choice will impact your home’s appearance, your long-term maintenance workload, your budget, and the siding’s overall lifespan. Here’s a comparison of the most popular options.
Wood vs. Vinyl: The Battle Between Tradition and Convenience
- Wood Siding: Offers unmatched natural beauty, authenticity, and a classic aesthetic. It can be stained or painted any color, and repairs are relatively straightforward for individual boards. However, wood is susceptible to rot, insects, and woodpeckers. It requires regular maintenance, including staining or painting every 5-10 years, to protect it from the elements. It is also one of the more expensive options upfront.
- Vinyl Siding: The champion of convenience and affordability. Vinyl is lightweight, easy to install, and requires virtually no maintenance beyond occasional cleaning. It is impervious to rot and insects. On the downside, some people find its appearance less premium than wood or fiber cement. It can become brittle in extreme cold, and colors can fade over time with sun exposure. Repairs can also be tricky, as replacing a single damaged panel may require removing an entire section.
Fiber Cement vs. Composite: Which Lasts Longer?
- Fiber Cement Siding: Engineered for maximum durability. Fiber cement is non-combustible, highly resistant to hail and wind damage, and completely immune to rot and pests. It holds paint exceptionally well, often lasting 10-15 years before a repaint is needed. With proper installation, it can last 50 years or more. Its main drawbacks are its weight, which increases labor costs, and the specialized tools required for cutting.
- Composite (Engineered Wood) Siding: A strong contender for longevity. Engineered wood is treated to resist moisture and fungal decay. It’s more dimensionally stable than solid wood, meaning it’s less likely to warp or split. It typically comes with long warranties (30+ years) and provides the look of real wood. While very durable, it is not as fire-resistant as fiber cement and can be susceptible to damage if the protective outer layer is compromised and moisture gets in.
Engineered Wood vs. Metal Siding: Weighing Sustainability and Cost
- Engineered Wood Siding: Often praised for its sustainable credentials, as it frequently uses wood scraps and fast-growing trees from managed forests. It offers a warm, traditional aesthetic. In terms of cost, it generally sits between vinyl and fiber cement.
- Metal Siding (Steel or Aluminum): Highly durable, fireproof, and 100% recyclable. Steel siding is exceptionally strong and resistant to denting, while aluminum is lightweight and will not rust. Both are low-maintenance. However, metal siding can be more expensive than other options and may not suit all architectural styles. It can also be noisy during rain or hail storms if not installed with proper insulation.
Factors That Influence Material Choice — Climate, Budget, and Aesthetic
- Climate: In wet, humid regions, materials resistant to rot and mold like fiber cement and vinyl are ideal. In areas with extreme temperature swings, a material with good dimensional stability like fiber cement or engineered wood is preferable to solid wood, which can expand and contract. For coastal areas with salt spray, vinyl and specially-coated metal are excellent choices.
- Budget: Your budget will be a primary driver. Vinyl is typically the most cost-effective option, followed by engineered wood. Fiber cement and traditional wood siding are premium choices with higher upfront costs for both materials and labor.
- Aesthetic: The look you want to achieve is crucial. For a truly authentic, historic look, nothing beats real wood. For a modern farmhouse, board-and-batten in fiber cement or engineered wood works well. For a clean, contemporary home, smooth-faced fiber cement or shiplap can provide a sleek finish.
Benefits of Lap Siding
Lap siding’s enduring popularity is no accident. It offers a powerful combination of practical advantages that make it a smart investment for nearly any home. From weather protection to curb appeal, the benefits are numerous.
Superior Weather Resistance and Wind Endurance (Up to 110 MPH!)
The overlapping design of lap siding is brilliantly simple and effective. It creates a shingled effect that gravity works with, not against, to shed water harmlessly away from your home’s structure. When properly installed and nailed according to manufacturer specifications, many siding systems, particularly fiber cement and vinyl, are rated to withstand wind speeds of 110 mph or more, making them suitable for a wide range of climates.
Low Maintenance Requirements for Busy Homeowners
For homeowners who would rather spend their weekends relaxing than working on their house, modern lap siding materials are a dream. Vinyl siding needs only an annual wash with soap and water. Fiber cement siding holds its paint finish for over a decade and is impervious to pests and rot. Engineered wood comes with a factory-applied finish that is warrantied for years. This “install it and forget it” quality is a major selling point.
Enhanced Curb Appeal and Modern Design Flexibility
Lap siding is a design chameleon. It can look rustic and traditional in a wood grain finish or sleek and modern in a smooth, dark color. You can alter its visual impact by choosing different exposure widths—narrower planks for a historic feel, wider planks for a contemporary look. The ability to mix colors and even combine horizontal lap siding with vertical board-and-batten on different sections of a home offers endless possibilities for customization.
Increased Insulation and Energy Efficiency
While siding itself provides some insulating value, its main energy efficiency benefit comes from creating a tighter building envelope. Properly installed siding, combined with a weather-resistant barrier (house wrap), reduces air infiltration, which is a major source of energy loss. Additionally, many manufacturers offer insulated siding options, which have a layer of rigid foam insulation bonded to the back of each panel. This can significantly boost a wall’s R-value, helping to lower heating and cooling costs.
Long Lifespan and Easy Repairability
High-quality lap siding is built to last. Fiber cement and engineered wood products often come with warranties of 30 to 50 years. While vinyl’s color may fade, the material itself can last for decades. Furthermore, repairing lap siding is often simpler than with other types. If a single board gets damaged by a stray baseball or a storm, a professional can typically remove and replace just that one piece without having to reside an entire wall, saving time and money.
Potential Drawbacks to Consider
No building material is perfect. While lap siding has many advantages, it’s important to be aware of its potential downsides. Understanding these challenges, particularly for those considering a DIY installation, can help you avoid costly mistakes.
Installation Complexity for DIY Projects
While the concept of lap siding is simple, a professional installation requires precision, skill, and specialized tools. Ensuring each course is perfectly level, maintaining consistent overlaps, properly flashing around windows and doors, and using the correct fastening technique are all critical. Mistakes can lead to an unprofessional appearance and, more seriously, water intrusion. For many homeowners, the complexity and physical demands of the job make hiring a professional the wiser choice.
Material Expansion and Contraction With Temperature Changes
Most siding materials expand and contract with changes in temperature. This is especially true for vinyl and wood. Installers must account for this movement by leaving small gaps at the ends of panels where they meet trim and by not nailing the panels too tightly. If these installation guidelines are ignored, vinyl siding can buckle and warp on hot days, and wood siding can cup or split. Fiber cement is much more dimensionally stable, making it less prone to these issues.
Possible Moisture Trapping Without Proper Underlayment
The number one enemy of any wall system is trapped moisture. While lap siding is designed to shed water, wind-driven rain can sometimes find its way behind the panels. This is why a high-quality, properly installed weather-resistant barrier (WRB), or house wrap, is absolutely non-negotiable. This secondary defense layer allows any moisture that gets past the siding to drain away safely and allows the wall assembly to breathe. Skipping or improperly installing the WRB can lead to catastrophic rot, mold, and structural damage.
Cost Variations Between Materials and Brands
The cost of a siding project can vary dramatically based on the material you choose. Vinyl is the most budget-friendly, while premium wood and fiber cement are at the higher end. Within each category, costs also differ between brands, with premium brands offering thicker panels, better warranties, and more sophisticated finishes. Labor costs will also be higher for materials that are heavier or more difficult to work with, like fiber cement. It is crucial to get detailed quotes that break down material and labor costs.
How to Choose the Right Lap Siding for Your Home
Selecting the perfect siding involves balancing aesthetics, budget, climate, and architecture. It’s a decision that will define your home’s look and performance for decades, so it’s worth taking the time to get it right.
Matching Siding Styles to Architectural Designs
The style of your home should guide your siding choice.
- Colonial or Cape Cod: Classic clapboard siding with a 4- to 6-inch exposure is the most authentic choice.
- Farmhouse (Classic or Modern): Simple, traditional lap siding is a great fit. For modern farmhouses, combining white horizontal lap siding with vertical board-and-batten in the gables is a very popular and effective look.
- Craftsman or Bungalow: A mix of materials works well. Consider using wider lap siding on the first floor with shingle siding in the gables. Earthy tones are traditional.
- Modern or Contemporary: Sleek, smooth-faced panels with wide exposures create the clean lines these styles demand. Shiplap or even vertically installed metal can also be striking options. Dark, bold colors often work well.
Color Psychology — Choosing the Right Shade for Longevity and Appeal
Color has a huge impact on how your home is perceived. Light colors like white, beige, and light gray make a home appear larger and have a timeless, classic appeal. Dark colors like charcoal, navy, and deep green can make a home look more modern, substantial, and dramatic. Keep in mind that dark colors absorb more heat, which can be a factor in hot climates, and they may be more prone to fading over time, so choosing a product with excellent UV resistance is key.
Local Climate Considerations: What Works Best Where You Live
Your regional climate should heavily influence your material choice.
- Hot, Humid Regions (e.g., the Southeast): Prioritize materials resistant to moisture, rot, and insects. Fiber cement and vinyl are top choices. Avoid wood unless you are committed to rigorous maintenance.
- Cold, Snowy Regions (e.g., the Northeast, Midwest): Choose a material that can withstand freeze-thaw cycles and potential impact from ice. Fiber cement is exceptionally durable in these conditions. Insulated vinyl siding can provide an extra thermal boost.
- Dry, Sunny Regions (e.g., the Southwest): UV resistance is paramount to prevent fading and material degradation. High-quality fiber cement with a factory-applied finish or lighter-colored vinyl will perform best. Stucco and stone are also common, but lap siding can be used effectively.
- High-Wind or Hail-Prone Areas (e.g., the Plains): Impact resistance is key. Fiber cement and steel siding offer the best protection against hail. Ensure any siding is installed to meet high-wind specifications.
Budgeting for Quality Without Overspending
Your siding budget should account for materials, labor, removal and disposal of old siding, and a contingency fund (10-15%) for unexpected issues, like discovering rotted sheathing once the old siding is off. While it can be tempting to choose the cheapest option, this is often a mistake. Investing in a higher-quality material and a professional installation will pay dividends in longevity, lower maintenance, and higher home value. Get at least three detailed quotes from reputable contractors to compare costs.
Consulting a Professional for Long-Term Planning
A consultation with an experienced siding contractor like Heritage Exteriors is an invaluable step in the planning process. A professional can provide an expert assessment of your home’s condition, recommend the best materials for your specific location and architecture, and provide an accurate, all-inclusive quote. They can also show you physical samples, discuss warranty details, and help you visualize the final result. This expert guidance ensures you make a choice you’ll be happy with for decades to come.
Tools and Materials You’ll Need for Lap Siding Installation
A successful siding installation hinges on having the right equipment. This is not a project that can be tackled with a basic home toolbox. Attempting this job without the proper gear can lead to poor results and, more importantly, can be dangerous.
Essential Tools — Saws, Levels, Fasteners, and Safety Gear
- Cutting Tools: For vinyl siding, a pair of tin snips and a utility knife may suffice for some cuts, but a miter saw with a fine-tooth plywood blade (installed backward) provides the cleanest cuts. For fiber cement, you will need specialized tools: either a circular saw with a polycrystalline diamond-tipped (PCD) blade designed for fiber cement, or special shears that minimize dust. Cutting fiber cement creates respirable crystalline silica dust, which is hazardous, making dust collection and a proper mask essential.
- Measuring and Layout Tools: Tape measure, chalk line, speed square, and a long level (4-foot minimum, but a laser level is even better) are crucial for ensuring your lines are straight and your courses are level.
- Fastening Tools: A hammer is a must, but a pneumatic siding nailer will make the job go exponentially faster and ensure consistent nail depth. You’ll need galvanized or stainless steel siding nails, with the type and length specified by the siding manufacturer.
- Specialty Tools: A zip tool is essential for removing or replacing vinyl siding panels. Snap-lock punches create tabs in vinyl siding. Siding gauges (like Gecko Gauges) are clip-on tools that hold a plank in place and set the correct overlap, allowing for one-person installation.
- Safety Gear: This is non-negotiable. Always wear safety glasses. Use a dust mask (N95-rated or better for fiber cement). Wear sturdy work gloves. If working above the first floor, use proper scaffolding or ladder jacks—do not try to work from stepladders.
Material Checklist — Panels, Underlayment, Trim, and Flashing
- Siding Panels: Calculate the total square footage of your walls (length x height), subtract the area of windows and doors, and then add 10% for waste.
- Weather-Resistant Barrier (WRB): Enough house wrap to cover the entire wall surface, with extra for overlaps. Use the manufacturer’s recommended seam tape.
- Starter Strip: A special piece of trim installed at the very bottom of the wall that locks the first course of siding in place and angles it correctly.
- Trim: Corner posts (inside and outside), J-channel (for around windows, doors, and where siding meets a soffit), and possibly window and door casing.
- Flashing: Self-adhering flashing tape for sealing window and door perimeters, and metal flashing for above windows/doors (drip caps) and at roof-to-wall intersections.
- Fasteners: The correct type and quantity of nails or screws as specified by the siding manufacturer.
- Sealant: High-quality, paintable exterior-grade caulk that is compatible with your siding material.
Safety Precautions for DIY Enthusiasts
Working on your home’s exterior involves inherent risks.
- Working at Height: Falls are the biggest danger. Ensure ladders are on stable, level ground. Use scaffolding for high walls. Always maintain three points of contact on a ladder.
- Power Tools: Understand and respect your tools. Keep guards in place. Disconnect power when changing blades.
- Dust Inhalation: As mentioned, cutting fiber cement creates dangerous silica dust. Work outdoors, use a saw with a dust collection port attached to a HEPA vacuum, and wear a fitted N95 respirator.
- Electrical Hazards: Be aware of overhead power lines. Note the location of exterior outlets and light fixtures; you may need to turn off circuits while you work.
When to Hire a Professional Crew
Consider hiring a professional if:
- You are uncomfortable working at heights.
- Your home is more than one story tall.
- You don’t own or have access to the specialized tools required (especially for fiber cement).
- You lack the time or physical ability to complete a large, labor-intensive project.
- You want the peace of mind that comes with a professional warranty on labor and installation.
For most homeowners, the safety, quality, and speed offered by a professional crew like Heritage Exteriors are well worth the investment.
Step-by-Step Lap Siding Installation Process
This section provides a general overview of the installation process. CRITICAL: Always read and follow the specific installation instructions provided by the manufacturer of your chosen siding product. Failure to do so can void the warranty and lead to product failure.
Step 1: Prepping the Wall Surface and Removing Old Material
The job begins with a clean slate. All old siding must be removed. Use a pry bar and hammer to carefully remove the old material. As you remove it, inspect the wall sheathing underneath for any signs of rot or damage. Any soft, discolored, or crumbling wood must be cut out and replaced with new, sound material. This is a critical step; covering up rot will only lead to a much bigger problem down the road. Also, remove gutters, downspouts, light fixtures, and shutters.
Step 2: Installing the Weather-Resistant Barrier
With the sheathing exposed and repaired, it’s time to install the house wrap. Start at a bottom corner and unroll the WRB horizontally, securing it with cap staples. Overlap each horizontal seam by at least 6 inches, with the upper layer overlapping the lower layer, shingle-style. Overlap vertical seams by 6-12 inches. Use the manufacturer’s recommended tape to seal all seams. Carefully cut an “X” over window and door openings, fold the flaps inside, and tape them securely to the frame. This creates a continuous barrier against air and water.
Step 3: Measuring and Cutting Panels Precisely
Measure twice, cut once. For horizontal siding, you’ll be making primarily 90-degree cross-cuts. Use a miter saw for the cleanest, most accurate cuts. Plan your layout to stagger the butt joints (where two panels meet end-to-end) so they don’t line up vertically from one course to the next. This is crucial for both aesthetics and weather resistance. When cutting vinyl, remember to allow for expansion by cutting it slightly shorter than the full wall length.
Step 4: Starting at the Bottom Course — Ensuring Level Installation
The first course of siding is the most important, as it sets the foundation for the entire wall. First, find the lowest point of the wall sheathing and snap a level chalk line for the top of your starter strip. Install the starter strip perfectly level along this line. Then, lock the bottom of your first course of siding into the starter strip. Use a level to check it before fastening. If this first piece is not perfectly level, every single course above it will also be crooked.
Step 5: Overlapping and Fastening Each Board Correctly
This is the core of the installation. For lap siding, each new course overlaps the previous one by a set amount (typically 1 to 1.5 inches). Siding gauges are extremely helpful here to ensure a consistent overlap. For vinyl siding, the panels lock together.
Fastening is critical:
- Nail Placement: Place nails near the top of the plank, in the designated nailing hem or area, so the nail is hidden by the next course.
- Nail Depth: Do not drive the nails tight. For vinyl, you must hang the panels, not pin them. Leave about 1/32-inch gap (the thickness of a dime) between the nail head and the siding. This allows the panel to expand and contract freely. For fiber cement and wood, drive nails snug, but do not overdrive them and break the face of the siding.
- Spacing: Follow the manufacturer’s instructions for nail spacing (e.g., every 16 inches into studs).
Step 6: Trimming Corners and Openings
Properly finishing corners and openings is what separates a professional job from an amateur one.
- Corners: Install inside and outside corner posts before you begin installing the siding panels. The ends of the siding will tuck into channels in these posts.
- Windows and Doors: Install J-channel around the top and sides of windows and doors. Cut the siding panels to fit into these channels. It’s crucial to install flashing correctly above windows and doors (under the house wrap, over the trim) to direct water out.
Step 7: Sealing, Caulking, and Painting or Finishing
Once all the siding is installed, it’s time for the finishing touches. Apply a high-quality, flexible exterior caulk where the siding meets trim at windows, doors, and corners. This provides a final seal against moisture. Use a caulk color that matches the siding or is paintable. If you’ve installed pre-finished siding, your job is done. If you’ve used primed fiber cement or wood, now is the time to apply two coats of high-quality exterior paint.
Step 8: Final Inspection and Cleanup
Do a final walkthrough of the entire job. Look for any loose panels, missed caulking spots, or unpainted areas. Re-install gutters, downspouts, light fixtures, and house numbers. Finally, do a thorough cleanup of the site, using a magnetic sweeper to pick up any stray nails. A clean job site is the final mark of a professional.
Common Mistakes to Avoid During Installation
Even small installation errors can lead to big problems. Being aware of these common pitfalls can help you ensure your siding project is a success.
Skipping the Moisture Barrier or Starter Strip
These are two of the most critical components for a successful installation. Skipping the house wrap (WRB) leaves your home’s structure vulnerable to water damage, rot, and mold. Skipping the starter strip will result in a crooked first course and an improperly angled siding installation, compromising its ability to shed water. These are not optional steps.
Misaligned Panels or Uneven Overlaps
Aesthetic issues are often the most obvious sign of a poor installation. Inconsistent overlaps create a wavy, unprofessional look. Butt joints that are not properly staggered create noticeable vertical lines up the wall, which is visually jarring and creates a weaker point for water intrusion. Use siding gauges and a level on every single course to prevent these issues.
Using Incompatible Fasteners
Using the wrong nails can cause premature failure. Standard steel nails will rust and leave ugly streaks down your siding. Using roofing nails with large heads can cause vinyl to crack. Using nails that are too short won’t properly secure the siding to the studs. Always use the fastener type (e.g., hot-dip galvanized, stainless steel) and size recommended by the siding manufacturer. This is essential for both performance and warranty compliance.
Ignoring Manufacturer’s Guidelines
Every siding product comes with a detailed installation manual for a reason. These documents contain critical information about proper fastening, clearance gaps for expansion/contraction, overlap dimensions, and flashing details. The manufacturer has tested their product extensively to determine the best way to install it for maximum longevity. Ignoring these guidelines is the fastest way to void your warranty and ensure a failed installation.
Poor Caulking That Leads to Moisture Damage
Caulking is your final line of defense against water. Using cheap, interior-grade caulk will result in it cracking and failing within a year. Not applying caulk in all the necessary places—like where siding meets window trim—creates a direct path for water to get behind your walls. Take the time to apply a continuous bead of high-quality, exterior-grade, flexible sealant to all joints and gaps.
Maintenance and Longevity Tips
Once your new lap siding is installed, a little bit of routine maintenance will keep it looking great and performing well for decades.
Annual Inspections and Minor Repairs
At least once a year, walk around your home and inspect your siding. Look for cracked or loose panels, chipped paint, or failing caulk. Pay close attention to areas near the ground or under eaves where moisture can be an issue. Catching and repairing small issues early is much easier and cheaper than dealing with a large-scale failure down the road.
Cleaning Techniques for Vinyl and Fiber Cement Siding
For most siding materials, an annual cleaning is all that’s needed.
- Vinyl: Use a soft-bristled brush or cloth with a solution of mild soap and water. For tougher stains like mildew, a solution of water and white vinegar often works. Rinse thoroughly with a garden hose. Avoid using a high-pressure power washer, as it can force water up behind the panels.
- Fiber Cement: Cleaning is similar to vinyl. A soft brush and mild detergent are usually sufficient. Because it has a painted surface, be gentle to avoid scratching the finish. Rinse well.
How to Repaint or Refinish Older Lap Siding
- Wood Siding: Wood siding will need to be repainted or re-stained every 5-10 years. The process involves thoroughly cleaning the surface, scraping any loose paint, sanding, priming bare spots, and applying two coats of high-quality exterior paint or stain.
- Fiber Cement Siding: One of the great benefits of fiber cement is how well it holds paint. When it eventually does need repainting (typically after 15+ years), the process is similar to wood but usually requires less scraping as the paint adheres better. Always use a 100% acrylic exterior paint.
Preventing Mold, Mildew, and Warping
Prevention is the best strategy. Keep bushes and shrubs trimmed back at least 12 inches from your siding to allow for air circulation. Ensure your gutters are clean and functioning properly to prevent water from cascading down your walls. Adjust sprinklers so they don’t spray directly onto the siding. These simple steps will drastically reduce the chances of moisture-related problems.
Eco-Friendly and Sustainable Siding Options
For environmentally conscious homeowners, there are many siding choices that align with green building principles. These options focus on recycled content, sustainable sources, and energy efficiency.
Choosing Low-VOC Paints and Finishes
When painting wood or fiber cement siding, opt for paints labeled as “Low-VOC” or “Zero-VOC.” Volatile Organic Compounds (VOCs) are solvents that are released into the air as paint dries, contributing to air pollution and potential health issues. Modern acrylic latex paints offer excellent performance with much lower VOC content than older oil-based paints.
Recyclable and Renewable Siding Materials
- Engineered Wood: Often made from wood byproducts, scraps, and sustainably harvested timber, reducing waste and pressure on old-growth forests.
- Metal (Steel and Aluminum): These materials are highly recyclable. Steel siding often contains significant recycled content, and both aluminum and steel can be fully recycled at the end of their life, preventing landfill waste.
- Wood: When sourced from forests certified by the Forest Stewardship Council (FSC), wood is a renewable resource.
Energy-Efficient Insulated Lap Siding Options
Insulated siding is an excellent green choice. It features a layer of rigid foam insulation fused to the back of the siding panel. This increases your wall’s R-value, reducing thermal bridging through the studs and lowering your home’s energy consumption for heating and cooling. This not only saves you money but also reduces your carbon footprint.
Green Certifications to Look For
When evaluating materials, look for recognized third-party certifications. The Forest Stewardship Council (FSC) certifies that wood products come from responsibly managed forests. The LEED (Leadership in Energy and Environmental Design) program awards points for using materials with recycled content and certified wood. Home Innovation Research Labs offers NGBS Green Certification for products meeting rigorous standards for sustainability and health.
Cost and ROI of Lap Siding Installation
A siding replacement project is a significant financial investment, but it’s one that can provide a substantial return, both in terms of home value and long-term savings.
Average Cost by Material Type (Vinyl, Fiber Cement, Wood, etc.)
Costs vary widely by region, but as a general guideline (including installation):
- Vinyl Siding: Typically the most affordable, ranging from $4 to $12 per square foot.
- Engineered Wood Siding: The next tier up, usually costing between $7 and $14 per square foot.
- Fiber Cement Siding: A premium option, generally running from $8 to $15 per square foot. The specialized installation requirements contribute to the cost.
- Natural Wood Siding: Can range from $8 to $20+ per square foot, depending on the species of wood and the finish.
- Metal Siding: Steel and aluminum typically fall in the range of $7 to $16 per square foot.
Labor Costs: DIY vs. Professional Installation
Labor typically accounts for 40-50% of the total project cost. While a DIY installation can save you this entire amount, it’s crucial to factor in the cost of tools you’ll need to buy or rent, the value of your own time, and the risk of costly mistakes. Hiring a professional contractor like Heritage Exteriors guarantees the job is done efficiently, correctly, and is backed by a labor warranty, which provides significant value and peace of mind.
Long-Term Value and Home Resale Impact
Exterior renovation projects consistently rank among the highest for return on investment. According to Remodeling Magazine’s Cost vs. Value report, a siding replacement project can recoup 80% or more of its cost upon resale. A home with new, attractive siding not only has higher curb appeal but also signals to buyers that the home is well-maintained and protected from the elements, making it a major selling point.
Cost-Saving Tips Without Cutting Quality
- Schedule in the Off-Season: Contractors are often busiest in the spring and summer. You may be able to get a better price by scheduling your project for the fall or winter.
- Do Some of the Prep Yourself: If you’re able, you could save some money by doing the tear-off of the old siding yourself, but consult with your contractor first.
- Choose Quality Over Frills: Opt for a high-quality material like fiber cement, but perhaps in a standard color rather than a premium, multi-tone finish to save on material costs without sacrificing durability.
- Get Multiple Quotes: Don’t take the first offer. Comparing detailed bids from several reputable companies is the best way to ensure you’re getting a fair price.
How Climate Affects Lap Siding Performance
The climate where you live is one of the most important factors in determining which siding material will perform best over the long run.
Best Siding Choices for Hot, Humid Regions
In areas with high humidity and rainfall, like the Gulf Coast or the Southeast, the primary enemies are moisture, rot, and insects.
- Top Choices: Fiber cement and vinyl siding are ideal. They are completely impervious to moisture and termite-proof.
- Material to Avoid: Untreated wood is a poor choice unless you are prepared for constant vigilance and maintenance to prevent rot and pest infestation.
What Works in Snowy or Wind-Prone Areas
In regions with heavy snowfall, freeze-thaw cycles, and high winds, durability and proper installation are key.
- Top Choices: Fiber cement is exceptionally resistant to impact from hail and debris and holds up well to temperature swings. Steel siding is also extremely tough. When installing any siding in a high-wind zone, it’s critical to follow the manufacturer’s high-wind nailing schedule.
- Considerations: Vinyl can become brittle in extreme cold, making it more susceptible to cracking on impact.
Sun Exposure, Fading, and UV Resistance
In sunny climates like the Southwest, the sun’s ultraviolet (UV) rays are the biggest threat.
- Top Choices: Fiber cement with a high-quality, factory-applied baked-on finish offers superior fade resistance. Lighter colors will also fade less noticeably than dark, saturated colors.
- Considerations: While modern vinyl has improved UV inhibitors, deep colors can still fade over time. Look for vinyl products that come with a strong warranty against fading.
Seasonal Maintenance Based on Climate
- Fall (All Climates): Inspect siding and caulk before winter. Clean gutters to prevent ice dams and water overflow.
- Spring (Snowy Climates): After the snow melts, inspect for any damage from ice, snowplows, or snow blowers near the base of the house.
- Summer (Humid Climates): This is the peak season for mold and mildew growth. Do your annual cleaning to wash away any organic matter that could feed it.
Design Inspiration and Modern Trends
Lap siding is a classic, but that doesn’t mean it’s boring. Today’s trends are all about using this versatile material in fresh and creative ways.
Trending Colors and Textures for 2025
Dark, moody colors continue to be popular, with charcoal gray, deep navy blue, and even black making bold statements. Earthy greens are also on the rise. For texture, smooth-faced panels are gaining favor in modern design for their clean, crisp look, while wide plank profiles with authentic wood grain textures remain a favorite for modern farmhouse and transitional styles.
Mixing Siding Styles for a Custom Look
One of the biggest trends is using mixed materials to add visual interest and break up large walls. A popular combination is to use horizontal lap siding on the main body of the house and then use vertical board-and-batten or shingle siding on accent areas like gables, dormers, or entryways. This creates a custom, architect-designed feel.
Lap Siding in Modern vs. Traditional Architecture
- Modern: Designers are using wide-exposure (8 inches or more) smooth lap siding, often installed with a “reveal” system that creates very sharp shadow lines. Dark colors and minimalist trim details complete the contemporary aesthetic.
- Traditional: For traditional homes, the focus is on authenticity. This means using classic clapboard or Dutch lap profiles with a 4- to 6-inch exposure, often in timeless colors like white, cream, or light blue, paired with appropriate historic trim details.
Case Studies: Before-and-After Transformations
Imagine a tired, dated 1970s ranch


