Wood siding is a hallmark of architectural beauty, offering a warmth and character that synthetic materials strive to imitate but rarely equal. From the rustic charm of cedar shakes to the clean lines of clapboard, wood has been the premium choice for American homes for centuries. However, unlike vinyl or aluminum, wood is a living, breathing material. It reacts to its environment—swelling with humidity, shrinking with dryness, and baking under the summer sun.
Over time, this constant movement takes a toll. Even the most well-maintained home will eventually show signs of stress, most commonly manifesting as cracks, splits, or warping. For a homeowner, discovering a long crack running down a siding board or noticing a plank that has started to cup and pull away from the wall can be alarming. Not only does it mar the curb appeal of your property, but it also signals a potential breach in your home’s armor against the elements.
The good news is that wood is remarkably forgiving. With the right techniques and a bit of know-how, many of these issues can be repaired without needing to re-side the entire house. This comprehensive guide will walk you through the best methods for repairing cracked siding and fixing warped wood siding, helping you decide when a simple patch will suffice and when it’s time to call in the professionals.
Understanding Why Wood Siding Fails
Before you pick up a hammer or a caulking gun, it is crucial to understand why the damage occurred. Repairing the symptom without addressing the cause is a recipe for frustration; the crack will simply return, or the new board will warp just like the old one.
The Mechanics of Cracking
Wood fibers are hygroscopic, meaning they absorb and release moisture. As wood dries out over years of sun exposure, it loses its elasticity and becomes brittle.
- Impact: A stray baseball, a falling branch, or even hail can shatter brittle, aged wood.
- Stress: If a board is nailed too tightly and tries to shrink, the tension can cause it to split down the middle.
- Fastener Failure: Rusty nails can expand, exerting pressure that cracks the wood around the nail head.
The Mechanics of Warping
Warping is almost always a moisture management issue. Wood warps when it dries unevenly.
- Cupping: Occurs when the back of the board remains wet while the front dries out (or vice versa). The wet side expands, causing the edges to curl.
- Bowing/Twisting: Often results from poor installation where the board was not allowed to move naturally or was fastened incorrectly into the studs.
- Lack of Finish: If the paint or stain has worn off, the wood absorbs water rapidly during rain and dries rapidly in the sun, leading to distortion.
Essential Tools and Materials for Wood Siding Repair Tips
To tackle these repairs effectively, you need a specific set of tools. Attempting these fixes with makeshift equipment often leads to more damage.
The Toolkit
- Pry Bar/Flat Bar: Essential for gently removing boards without damaging the ones above or below.
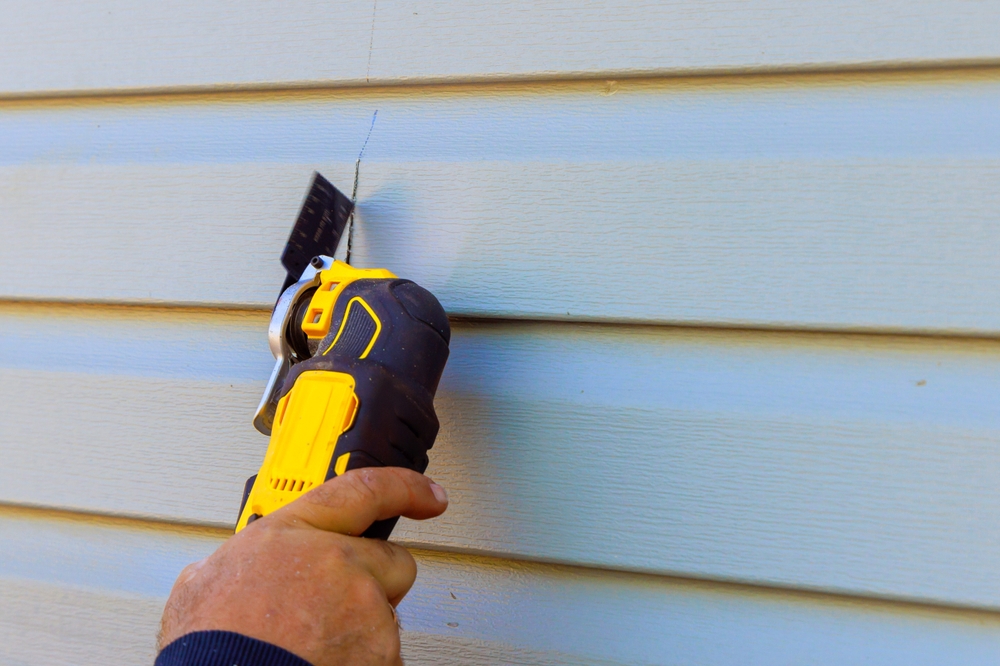
- Oscillating Multi-Tool: A game-changer for making precise plunge cuts in siding without cutting the sheathing behind it.
- Hammer and Nail Set: For driving new nails and sinking the heads below the surface.
- Utility Knife: For scoring paint and cutting caulk.
- Backsaw or Circular Saw: For cutting replacement boards to size.
The Materials
- Exterior Wood Glue: Waterproof glue (like PVA Type II or III) is vital for bonding cracks.
- Siding Nails: Always use stainless steel or hot-dipped galvanized ring-shank nails. Regular nails will rust and stain your siding.
- Epoxy Wood Filler: For filling holes and gouges. Avoid standard interior wood putty; it won’t survive the weather.
- Primer and Paint: High-quality exterior acrylic latex paint and oil-based primer are industry standards.
Method 1: Repairing Small Cracks and Splits
Not every crack requires board replacement. If the crack is clean, relatively fresh, and the wood around it is sound (not rotten), you can often repair it in place. This is one of the most cost-effective wood siding repair tips for minor damage.
Step 1: Clean the Crack
Dirt and debris prevent glue from bonding. Use a stiff brush or compressed air to clean out the split. If the crack is tight, gently use a putty knife to open it slightly—be careful not to extend the crack further.
Step 2: Apply Waterproof Glue
Squeeze a generous amount of waterproof exterior wood glue into the crack. You can use a toothpick or a thin shim to push the glue deep into the fissure. You want full coverage on both internal surfaces of the split.
Step 3: Clamp the Board
This is the tricky part. You can’t exactly use a C-clamp on a flat wall.
- The Screw Method: Drive a screw into the solid wood below the crack. Tie a strong string or wire around the screw head. Drive another screw into the wood above the crack. Pull the string tight to draw the two sides of the crack together, then secure the string.
- The Wedge Method: If the crack is near the ground or a corner, you might be able to wedge a 2×4 against the split to hold it shut while the glue dries.
Step 4: Pin It (Optional)
For added security, drive small finish nails through the glued section at an angle to hold the wood fibers together.
Step 5: Sand and Paint
Once the glue is fully cured (usually 24 hours), remove any clamps or screws. Sand the surface smooth. If there is still a visible divot, fill it with epoxy wood filler. Prime the area and paint it to blend with the rest of the wall.
Method 2: Filling Holes and Gouges
Woodpeckers, insects, and misplaced nails can leave unsightly holes in your siding. While small, these holes are entry points for water and pests.
Using Epoxy Wood Filler
For this repair, two-part epoxy is superior to standard wood filler. It bonds aggressively, is structural, and won’t shrink.
- Prepare the Hole: removing any loose, rotting, or soft wood. Drill the hole out slightly if needed to reach solid wood.
- Mix the Epoxy: Combine the resin and hardener according to the package instructions.
- Fill: Overfill the hole slightly, as you will sand it flush later.
- Shape: As the epoxy begins to set, you can roughly shape it with a putty knife to match the profile of the siding.
- Finish: Once hard, sand it flush, prime, and paint.
Method 3: Fixing Warped Wood Siding (The “Screw and Plug” Method)
Warped boards are stubborn. Wood has “memory,” and once it twists, it wants to stay twisted. However, if the warping is mild (cupping or a slight bow), you might be able to force it back into place without replacing it.
Note: This method only works if the wood is still solid. If the board is rotten or brittle, it will crack when you try to flatten it.
Step 1: Locate the Studs
You need something solid to anchor the warped board to. Use a stud finder to locate the framing members behind the siding.
Step 2: Drill Pilot Holes
Drill a pilot hole through the warped section of the siding. This hole should be slightly wider than the shank of the screw you intend to use to prevent the wood from splitting under pressure.
Step 3: Countersink
Drill a shallow, wider hole (countersink) at the top of your pilot hole. This will allow the screw head to sit below the surface of the wood.
Step 4: Drive the Screw
Use a long, heavy-duty exterior wood screw (3 inches or longer). Drive it through the pilot hole and into the stud. As you tighten the screw, it will pull the warped board flat against the wall. Go slowly! If you hear cracking sounds, stop. You may need to back it out and try again or accept that the board needs replacement.
Step 5: Plug the Hole
You will be left with a screw head visible in your siding. Do not just caulk over it. Use a wood plug (available at hardware stores) glued into the countersunk hole, or fill it with epoxy filler. Sand and paint for an invisible repair.
Method 4: The “Cut and Replace” Technique (Partial Replacement)
Sometimes, the damage is too severe for glue but localized to a small section of a long board. Replacing a 12-foot board because of a 6-inch damaged spot is unnecessary labor. Instead, you can cut out the bad section and splice in a new piece. This is a common technique used by pros in siding repair.
Step 1: Isolate the Damage
Identify the damaged section. You want to make your cuts directly over wall studs if possible, as this gives you a nailing surface for the new piece. However, with modern sheathing, you can sometimes get away with blocking behind the joint.
Step 2: Protect Surrounding Boards
Insert wooden shims under the damaged board to separate it from the board below. This protects the lower board from your saw blade and creates room to work.
Step 3: Cut the Board
Use a backsaw or an oscillating multi-tool to make vertical cuts on either side of the damage. Be extremely careful not to cut into the building paper or sheathing behind the siding.
Step 4: Remove the Fasteners
You will likely need to cut the nails holding the damaged section. Slide a hacksaw blade or a mini pry bar with a nail puller slot under the board to sever the nails.
Step 5: Remove the Piece
Gently pry out the cut section. If it’s stuck, you may need to chip it out with a chisel.
Step 6: Cut the Replacement
Measure the gap precisely. Cut a new piece of matching siding to fit. Ideally, the fit should be snug but not tight enough to buckle when humidity rises.
Step 7: Install and Caulk
Apply a bead of caulk to the vertical edges of the existing siding where the new piece will join. Slide the new piece in. You may need to tap it gently with a wood block and hammer. Nail it into place (preferably into a stud). Wipe away excess caulk, prime, and paint.
Method 5: Full Board Replacement
If a board is severely warped, rotted, or cracked along its entire length, replacement is the only viable option to repair cracked siding effectively. While this seems daunting, it is a straightforward process if you take your time.
Step 1: Cut the Caulking
Run a utility knife along the edges of the board where it meets trim or corner boards to slice through the paint and caulk seal.
Step 2: Locate and Remove Nails
This is the most labor-intensive part. Siding is often nailed at the top, and that nail is covered by the board above it.
- Locate: Slide a flat bar up under the board above the one you are removing to find the nails.
- Remove: Gently pry the upper board out slightly (don’t crack it!) and slip a pry bar in to lift the nail head. Alternatively, use a “slate ripper” or hacksaw to cut the nails flush with the sheathing.
Step 3: Remove the Damaged Board
Once the nails are cut or removed, the board should slide out downward. If it resists, check for hidden nails.
Step 4: Inspect the Wall
With the board gone, you have a window into the health of your home. Check the building paper (or house wrap). Is it torn? Is the sheathing behind it wet or rotted? If you find damage here, simply putting a new board over it is a mistake. You must repair the waterproofing layer first.
Step 5: Prepare the New Board
Measure and cut your new siding board.
- Crucial Step: Prime the cut ends and the back of the board. This is called “back-priming.” Most warping is caused by the back of the board absorbing moisture because it was never painted. Sealing the back ensures the board remains stable.
Step 6: Install the New Board
Slide the new board up into position. It should lock into the alignment of the wall. Check it with a level.
- Nailing: Drive ring-shank siding nails through the face of the board. Ideally, you want to hit the studs. Do not overdrive the nails. The head should sit flush with the wood surface, not buried in a crater.
Step 7: Finishing Touches
Caulk the vertical seams where the board meets trim. Do not caulk the horizontal lap at the bottom of the board—this gap is necessary for the wall to breathe and moisture to escape. Prime the nail heads and paint the board.
Prevention: Keeping Your Siding Straight and Sound
The best way to handle repairs is to avoid needing them in the first place. Proper maintenance is the key to longevity.
1. Maintain the Finish
Paint and stain are more than just colors; they are UV blockers and moisture barriers. If your paint is chalking or peeling, your wood is exposed. Repaint every 5-7 years and restain every 3-5 years.
2. Monitor Landscape Moisture
Keep sprinklers pointed away from the house. A board that gets soaked every morning by a rogue sprinkler head will warp and rot in record time. Keep bushes trimmed back at least a foot from the wall to allow airflow.
3. Clean Gently
Wash your siding annually to remove mildew and dirt. Avoid high-pressure power washers, which can inject water deep into cracks and behind boards, causing swelling and warping.
When to Call a Professional
While many of these repairs are within the reach of a handy DIYer, there are times when bringing in a professional is the smarter choice.
1. The Scale of Damage
If you have one or two cracked boards, DIY is feasible. If you have an entire wall of warped siding, you likely have a systemic installation or ventilation issue. A professional can diagnose why the wall failed and re-side it correctly.
2. High or Hard-to-Reach Areas
Repairing siding on the second story or near steep rooflines requires scaffolding and safety gear. Do not risk your life on a ladder to fix a piece of wood.
3. Matching Historic Profiles
If you own an older home, your siding profile might not be available at the local lumber yard. Professional siding contractors often have relationships with mills that can custom-cut wood to match your specific heritage profile perfectly.
4. Structural Concerns
If you pull off a board and find soft, rotting sheathing or framing underneath, stop immediately. This is no longer a cosmetic repair; it is a structural one. You need a contractor who can shore up the wall and replace the damaged structure.
Conclusion: Restoring the Integrity of Your Home
Your home’s exterior is its first defense against the world. Cracked and warped siding boards are chinks in that armor. While wood requires maintenance, its ability to be repaired—board by board—is one of its greatest strengths. You don’t have to live with unsightly damage or worry about water intrusion.
By identifying the type of damage and applying the correct repair method—whether it’s a simple epoxy fill, a strategic splice, or a full board replacement—you can extend the life of your siding for decades.
However, if your inspection reveals widespread issues or if the prospect of precise carpentry feels overwhelming, don’t hesitate to seek help. The team at Hexteriors specializes in assessing siding health and performing seamless repairs that restore your home’s beauty and weather resistance. Visit our Residential Siding Services page to learn more about how we can help you protect your biggest investment.


